Tuesday, September 16, 2008

LiFePO4 40138 Cell - Close Up

I admit it. I have to take things apart. A device sitting there hermetically sealed in shrinkwrap seems normal at first. At some point, however, a small voice starts to taunt from somewhere inside that shrinkwrap. And that's it. Out comes the tools.

Here's a closer look at a single 40138 cell. This construction seems to be fairly typical of other 40138 cells.

Before: Cell with insulating end label and shrink wrap in place. 
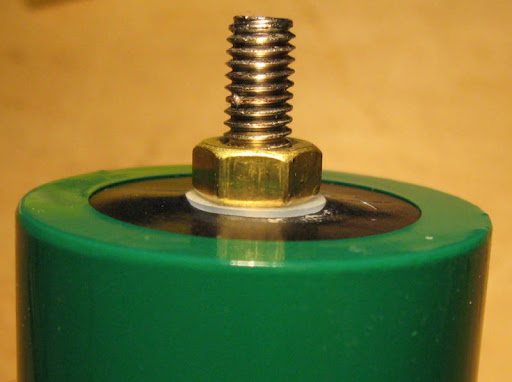
The cell ends are covered with an adhesive label. There's an 'X' cut into each label that falls over the cell vent. There's a vent in each end of the cell. The rest of the cell is covered in a layer of shrink wrap plastic.

After: The complete cell in all its bare aluminum glory. The body of the cell (tubing and end caps) is aluminum.
Close-up of cell end showing thick cast end cap with gas vent and four depressions. Each end has a vent and four circular depressions. The depressions appear to be features of the end caps, which appear to be cast. The depressions are 1.47mm deep and the vent is 1.59mm deep.

End caps are welded to the cell body tube. 
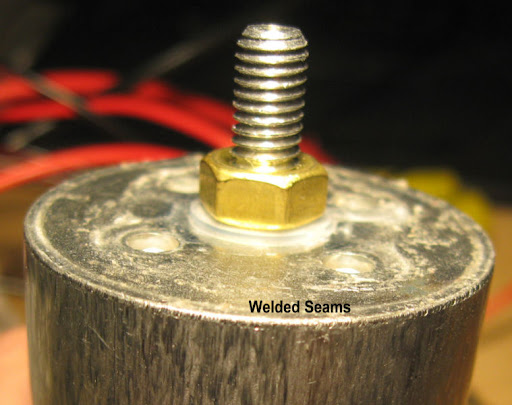
The joints between the body tubing and end caps are welded.


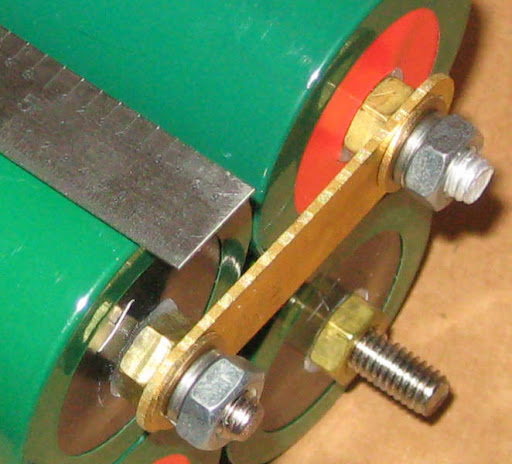
I don't mind working with a bare cell on the bench, but it's important to ensure the cell covering remains intact in use. The cell can be shorted between positive and negative terminals like any other cell, but it can also be shorted between either terminal and the outer cell casing (aluminum body tube and end caps).

For example - this cell is fresh from the charger and is reading 3.557 volts between the positive and negative terminals. There is 1.074V between the positive terminal and the case, and 2.482V between the negative terminal and the case.

Whether you're making an electric bicycle pack or a battery for your electric trolling motor, mount the cells securely and isolate them from each other and any part of the battery pack that will conduct electricity. It won't take very many miles of e-biking to wear thru the shrink wrap.

Saturday, September 6, 2008

Working with 40138 Cells

40138, A123Systems 18650 and 26650 LiFePO4 Cells Here's a 'family portrait' of sorts. The pair of yellow cells are A123Systems 18650 cells. These were removed from a Black and Decker VPX pack. The larger white cell is a 26650 cell from A123Systems. It was removed from a 36volt DeWalt DC9360 battery pack. The green cell is our text subject, a 40138 LiFePO4 cell.

The numbers - 18650, 26650 and 40138 - give cell dimensions in milimetres. The first pair of numbers - 18, 26, and 40 are the cell diameter. The 650 and 138 are cell length without terminals...almost. The smaller cells swap the zero around. The pair of cells from A123Systems are about 65mm long - not 650.

The smaller cells have connections spot welded on. The larger cell is fitted with 6mm bolts. This makes it easy to wire a pack, and change pack configuration later.

Closeup of 40138 negative terminal showing nut and sealing washer

Here's a close-up of a cell terminal. See the nylon washer under the nut? That's part of the cell's sealing system. The nuts on the terminal studs must stay in place. Loosen the nut and the cell will leak.

The cell is covered with a layer of shrink wrap insulation. There's a barcode label on the aluminum cell casing in addition to the one on the outside.

Cell connection example - connecting strap with nut and lockwasherHere's a terminal mounting example. The connection strap is against the nut installed on the cell. There's an optional flat washer against the strap, then a mandatory lock washer, and nut.

Connecting example using 1/4 inch ring terminals

Here's another wiring example. The 1/4 inch crimp-on ring terminals are connected to 10AWG wires. There's enough room for a pair of terminals as long as they're 'back to back'.

It's very important to secure each connection. Use lock washers, spring washers, locktite, or something similar on all cell connections. Electrical resistance increases when a connection becomes loose. Just like an electric stove burner, current flow and resistance equals heat. At best, performance will decrease as nuts loosen. At worst, the connection can heat enough at higher electrical flow to start a fire.

Inspect cell connections as part of your preventive maintenance schedule. You can use fingernail polish on the end of the nut to see if the connection has loosened.

It's best to use a torque wrench when assembling cells into a pack. Maximum torque is 6.9 lb-in or .78 nm.